Configurable GUI Ripper: User Guide
The Configurable Ripper allows:
- to test an arbitrary Android application having its apk;
- to test an arbitrary Android application having its source code and measure the code coverage reached by the generated tests.
Download
![]() Configurable GUI
Ripper for Windows (zip file)
Configurable GUI
Ripper for Windows (zip file)
Output samples
![]() TomDroid
explored with a systematic strategy (coverage enabled)
TomDroid
explored with a systematic strategy (coverage enabled)
![]() TomDroid
explored with a random strategy for three times (coverage enabled)
TomDroid
explored with a random strategy for three times (coverage enabled)
Minimal requirements for the execution of the GUI Ripping Toolset
1. Windows XP or better (a Linux version of the GUI Ripping Toolset will be published soon);
2. JDK v.1.6.x, with x<=43 (downloadable here) We encountered problems with Java 1.6.45 and with Java 1.7
3. Android sdk v.18 or better (downloadable here). Intel x86 Emulator Accelerator (HAXM) is recommended.
4. Libraries for Android 2.3.3 or better (downloadable via the Android SDK Manager included in the Android sdk)
5. Android libraries needed to compile the application under test (if different from Android 2.3.3)
6. Ant version 1.8.2 or better (downloadable here)
In the recently released ADT Bundle installation of Android sdk some executable files has been moved, so we distinguish between two different set of settings depending on the installation of the ADT Bundle or of the traditional ADT extension of Eclipse
Our Configurable Ripper could fail in the analysis of applications compiled specifically for Android 4.*
Eclipse ADT Extension
- ANDROID_HOME must be set to the sdk path of Android (e.g. C:\Android\android-sdk)
- JAVA_HOME must be set to the Java sdk path (e.g. C:\Java\jdk1.6.0_33)
- the PATH system variable must contains some speficic paths :
- bin path of ant (e.g. D:\apache-ant-1.9.0\bin)
- platform-tools path of Android (e.g. C:\Android\android-sdk/platform-tools)
- tools path of Android (e.g. C:\Android\android-sdk\tools)
- the path containing the executable aapt.exe. Since different versions of aapt.exe have been released for different Android APIs, you must search the path containing this file in the build-tools subfolders. In our tests, we used the aapt.exe files associated to the Android 4.2.2 (API 17) release, so the path is similar to C:\Android\android-sdk\build-tools\17.0.0
A complete example is:
ANDROID_HOME="C:\Android\android-sdk"
JAVA_HOME="C:\Java\jdk1.6.0_33"
PATH="%PATH%;C:\Android\android-sdk/platform-tools;C:\Android\android-sdk\tools;C:\Android\android-sdk\build-tools\17.0.0;C:\Ant\bin"
ADT Bundle
- ANDROID_HOME must be set to the sdk path of Android (e.g. D:\adt-bundle-windows-x86-20130514\sdk)
- JAVA_HOME must be set to the Java sdk path (e.g. C:\Java\jdk1.6.0_33)
- the PATH system variable must contains some speficic paths :
- bin path of ant (e.g. D:\apache-ant-1.9.0\bin)
- platform-tools path of Android (e.g. D:\adt-bundle-windows-x86-20130514\sdk\platform-tools)
- tools path of Android (e.g. D:\adt-bundle-windows-x86-20130514\sdk\tools)
- the path containing the executable aapt.exe. Since different versions of aapt.exe have been released for different Android APIs, you must search the path containing this file in the build-tools subfolders. In our tests, we used the aapt.exe files associated to the Android 4.2.2 (API 17) release, so the path is similar to D:\adt-bundle-windows-x86-20130514\sdk\build-tools\android-4.2.2
A complete example is:
ANDROID_HOME="D:\adt-bundle-windows-x86-20130514\sdk"
JAVA_HOME="C:\Java\jdk1.6.0_33"
PATH="%PATH%;D:\adt-bundle-windows-x86-20130514\sdk\platform-tools;D:\adt-bundle-windows-x86-20130514\sdk\tools;D:\apache-ant-1.9.0\bin;D:\adt-bundle-windows-x86-20130514\sdk\build-tools\android-4.2.2"
Please note that the new adt bundle version of Android places the SDK Manager.exe file in a folder different to the sdk one. In this case, please make a copy of SDK Manager.exe in the sdk folder.
Preliminary Step
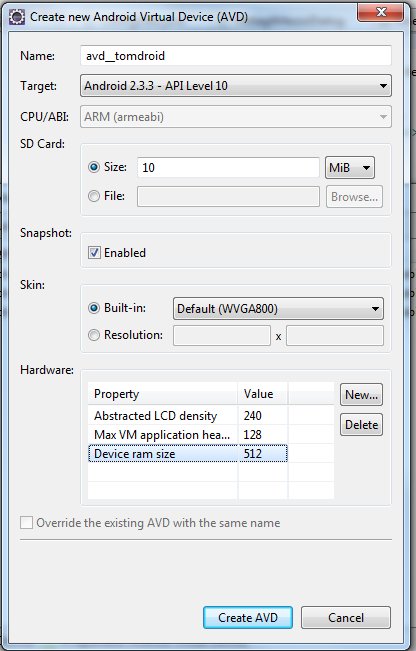
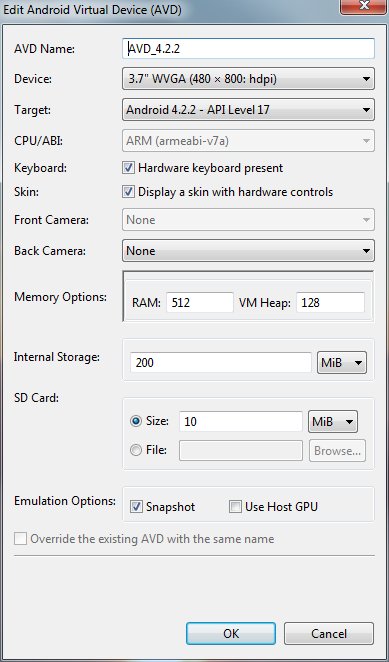
Creating the AVD
In order to carry out the GUI Ripping activities, a virtual Android device is needed. An Android Virtual Device (AVD) can be created via the android utility of the SDK (see here how it is possible).
Warning: it is strongly advised to create a new avd for any ripper execution without reusing already used AVDs.
|
The minimal configuration for the AVD to be created is the following: a. Target: Android 2.3.3 - API Level 10 (or better) b. SD Card: Size 10 MB (or better) c. Snapshot: Enabled d. Max VM Application Header 128 e. Device Ram size: 512 (or better) Once the AVD has been created, the following five steps have to be carried out. New AVD Manager releases contains also other options, but their values do not influence the correct execution of the Ripper.
|
 |  |
Unzipping the package
The Configurable Ripper file has to be unzipped in a folder of your choice. Rar files can be opened with WinRAR.
The package includes three folders (batch, data and tools) and the file AndroidRipper.bat in the main folder.
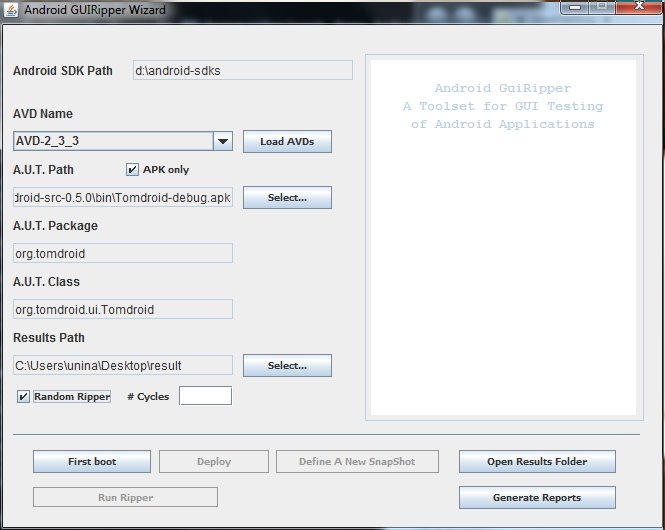
Executing the Wizard
Let execute the AndroidRipper.bat batch file. A simple GUI to be filled is shown.
A shell window containing useful run-time information is opened, too.
|
The input fields to be filled are the following:
Further parameters can be set by modifying preferences.xml files included in the data folder. |
 |
Ripping Process
The following four steps have to be executed by clicking the corresponding buttons.
Device Boot
In the Device Boot stepi, the device emulator is preliminary booted. When operative system booting is completed, the user can proceed to the next step
Deploy
In the Deploy step, the code of the Android application under test is instrumented by the Emma library (for code coverage assessment) and deployed into the AVD emulator tool together with the GUI Ripper itself. Successively, an image of the Android system, called Snapshot image, is created, in order to be restored after each ripping step execution. It is recommended that the AVD has just be created for this execution.
Define Snapshot
By clicking on this button, the emulator is re-opened and the user has to fix the initial state of the device and of the application that will be the starting point for any future test case. When the desired starting interface is reached, the user has to close the emulator: a snapshot of the device image will be autoimatically closed.
Run Ripper
By clicking this button the Ripping process is started. This step of the process is completely automatic and it can last many hours for complex applications. No user interactions are needed until the execution is terminated.
Generate Reports
By clicking this button, the collected data are elaborated and outputs such as the Execution Report, the generated Test cases, the GUI Tree and the Code Coverage report are generated.
Open Results Folder
. It opens the folder with all the results files.
The Restore option can be used if we want to continue an incomplete ripping. In this case, we have to check Restore and to click the Run Ripper button
Input files description
Many parameters influencing the execution of the ripper can be set.
The file preferences_Ripper.xml contains parameters influencing the execution of the Ripper when it performs a systematic exploration of the GUIs.
The file preferences_Random.xml contains parameters influencing the random exploration.
Both the preferences files have the same structure.
Structure of xml preferences files
- General parameters
- Automation parameters
- Scheduler parameters
- Interactions parameters
- Planner parameters
- Comparator parameters
- Strategy parameters
General parameters
- PACKAGE_NAME: String
The name of the package that contains the classes (specifically, the activities) which make up the application under test.
Technically, this parameter defines the target package for the Instrumentation; as a result, any attempt to exercise items of software residing outside this package will result in a Runtime Exception and a "dead" branch of the Gui Tree.
- CLASS_NAME: String
The fully qualified name (i.e. including the package) of the class of the start activity of the application under test.
Every trace in the ripping session will have this activity as its starting point.
- RANDOM_SEED: long {0 = random}
This value is used to setup the randon number generation mechanism. Several instances of this are used with various purposes such as: filling in the values of text fields, randomizing the sequence of actions to be performed when using the Random engine, and so on...
When initialized with the same seed, the Ripper should be able to generate the same sequence of random numbers, allowing the exact repetition of a session.
When set to zero, a random seed will be generated at startup based on the system time.
Automation parameters
Following are the entries of the map stored in the automation sub-node (direct child of the main node) of the XML file.
- SLEEP_AFTER_EVENT: int
How many milliseconds to wait after perfoming each of the actions of which a task is comprised of.
- SLEEP_AFTER_RESTART: int
How many milliseconds to wait at restart, that is before perfoming any of the actions in a task.
- SLEEP_AFTER_TASK: int
How many (additional) milliseconds to wait at the end of a task, after having perfomed all the actions it is comprised of.
- SLEEP_ON_THROBBER: int
How many milliseconds to wait after an event if a throbber (spinning wheel displayed when the user is supposed to wait) is on the screen.
Note that the Ripper will always wait SLEEP_AFTER_EVENT ms even if the throbber disappears before this amount of time. Then, it waits for the throbber to disappear; if SLEEP_ON_THROBBER ms pass, the Ripper proceeds to the next event, even if the throbber is still displayed.
- SCREENSHOT_FOR_STATES: boolean
When true, an image capture of the display screen is performed after the last action in a task has been performed and saved as a JPEG file.
- SCREENSHOT_ONLY_NEW_STATES: boolean
When true, a screenshot is saved at the end of a task only when a new state is found; in other words, when the final state of a task is equivalent to one of the states already discovered (which we already have a screenshot of), no further pictures are taken.
Ignored if SCREENSHOT_FOR_STATES = false
- SCREENSHOT_FOR_EVENTS: <not yet implemented>
Scheduler parameters
Following are the entries of the map stored in the scheduler sub-node of the XML file.
- SCHEDULER_ALGORITHM: {BREADTH_FIRST|DEPTH_FIRST}
The strategy used to explore the application under test:
- with the DEPTH_FIRST algorithm, the branch starting from a node of the GUI Tree is explored thoroughly before exploring the neighbours of (nodes at the same depth than) that node;
- with the BREADTH_FIRST algorithm, on the opposite, all neighbouring nodes are explored before descending to deeper nodes.
Unused by the Random Ripper.
- MAX_TASKS_IN_SCHEDULER: int
Tasks to be performed during the ripping session are planned in advance and stored in a task list. This parameter limits the dimension of this list.
This is useful when using the Random ripper, since it can generate very long sequence of actions, leading to long I/O operations and possibly "Out of Memory" errors.
Interactions parameters
Following are the entries of the map stored in the interactions sub-node of the XML file.
- EVENTS: String []
Defines the type of the interactions to be fired by the Ripper as events, and the types of the widget upon which to fire them.
Each String in the array will start with the Interaction Type of the event to fire, followed by the Simple Types of the widgets on which the event should be fired, separated by a comma. Spaces will be ignored.
Example: "click, button, image, menuItem"
- INPUTS: String []
Defines the type of the interactions to be fired by the Ripper as inputs and the types of the widget upon which to fire them.
The format is the same as for the EVENTS.
Planner parameters
Following are the entries of the map stored in the planner sub-node of the XML file.
- MAX_EVENTS_PER_WIDGET: int {0 = infinite}
Limits the number of times an event is generated when iterating on a group widget.
For instance, when MAX_EVENTS_PER_WIDGET = 0 the selectListItem interaction generates a select event (scroll, focus and click) for each entry in a List View.
If MAX_EVENTS_PER_WIDGET = 5, only the first five elements in the List View (including separators) will be selected.
- PLANNER: String {SimplePlanner}
Currently, the unique possible value is "SimplePlanner"
- TEXT_VALUES_ID_HASH: boolean
To be set to true
Comparator parameters
Following are the entries of the map stored in the comparator sub-node of the XML file.
- COMPARATOR_TYPE: String
This parameter defines the state equivalence criterion. Allowed values are:
- NullComparator: no comparation, two states are always different (this is the default)
- NameComparator: two states are equivalent if they share the same name (they are instances of the same Activity)
- CustomWidgetsComparator: two states are equivalent if they share the same set of widgets (each widget in state A is equivalent to a widget in state B and viceversa)
- CustomWidgetsDeepComparator: two states are equivalent if they share the same set of widgets, and the equivalent widgets share the same properties
For instance, if state A has an Edit Text with id 1234, CustomWidgetsComparator requires that state B has an Edit Text with id 1234 in order to consider B equivalent to A. CustomWidgetsDeepComparator additionally requires that the Edit Text has the same hint text.
- COMPARE_STATE_TITLE: boolean
When true, NameComparator also checks whether two states have the same title. That is: two states are the same if they share the same name and title.
If COMPARE_ACTIVITY_NAME = true, this also applies for the other Comparator types.
- COMPARE_LIST_COUNT: boolean
When true CustomWidgetsComparator and CustomWidgetsDeepComparator will consider two List View to be equivalent only if they have the same size.
- COMPARE_MENU_COUNT: boolean
When true CustomMenuComparator and CustomWidgetsMenuComparator will consider two Menu to be equivalent only if they have the same size.
- COMPARE_VALUES: boolean
When true, CustomWidgetsDeepComparator will consider two widgets to be equivalent only if they have the same value.
For instance, if state A has a Rating Bar with id 4567, name "Vote for this book" and sat to the value of "4 stars", state B will not be equivalent to A unless it has a Rating Bar with the same id and the same name which is set to the same value.
Strategy parameters
Following are the entries of the map stored in the strategy sub-node of the XML file.
- MAX_NUM_TRACES: int {0 = infinite}
Terminates the ripping session after processing this amount of tasks. 0 value is not admitted for Random Ripping.
- TRACE_MAX_DEPTH: int {0 = infinite}
Limits the exploration of the GUI to a certain depth of the resulting GUI Tree.
When TRACE_MAX_DEPTH = n>0, GUIs resulting from the execution of n actions (that is, nodes at depth n in the GUI Tree) won't be further explored, even when they're new and events could be fired on them.
- EXPLORE_ONLY_NEW_STATES: boolean
When true, states that are equivalent to previous one (according to the defined Comparator) won't be explored.
The Random engine forces EXPLORE_ONLY_NEW_STATES = false for obvious reasons.
When set to false, either TRACE_MAX_DEPTH or MAX_NUM_TRACES should be provided. Otherwise, there won't be any termination criterion, and the exploration will continue indefinitely.